Invite your team
Invite each member of your team to Service Buddy and pick an access level that controls what they can see and do. Service Buddy has access levels for installers and measurers, sales staff, office and admin staff, accounting, and marketing — choose the one closest to each person’s day-to-day role. Each person gets their own login.
Before you start
Section titled “Before you start”Have the following ready for each person you want to invite:
- Full name
- Work email address (this becomes their login)
- Role (installer, measurer, sales, office, accounting, etc.)
- Phone number (optional but useful for SMS notifications)
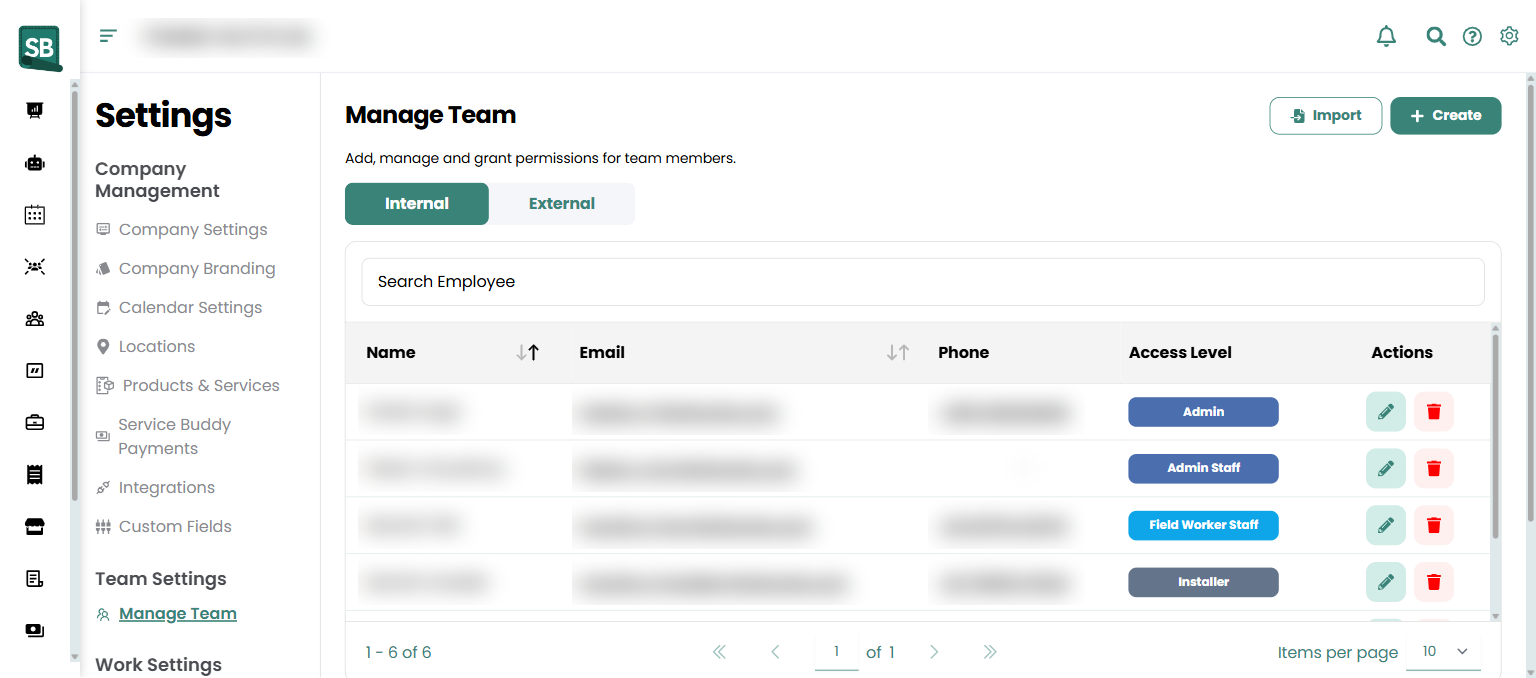
1. Open Manage Team
Section titled “1. Open Manage Team”There are two ways to get to Manage Team — both end up in the same place:
- Faster: Click the gear icon in the top-right corner and choose Manage Team.
- Or: Open Settings in the left sidebar, then click Manage Team under the Team Settings section.
On the Manage Team page, click + Create in the top-right. You can also click Import next to it to bring in employees from a spreadsheet.
2. Fill in employee details
Section titled “2. Fill in employee details”In the Create Employee drawer, work through the three sections:
Basic Details
- Select a Prefix (optional — Mr., Ms., Mrs., Miss., or Dr.).
- Enter the employee’s First Name and Last Name.
- Enter their Email Address — this becomes their login.
- Enter their Phone Number (the country code defaults to your account’s country).
- Optionally add a Phone Number (Alternative).
- Choose an Access Level — this controls what they can see and do. See section 3 below.
Address Details (optional) — Address Line 1, 2, 3, City, State, Post Code, Country.
Other Details
- Optionally add Tags — useful for grouping employees (
Carpet Crew,Hardwood Specialist,1099 Sub,Bilingual). Type a tag and press Enter to add it. Tags on employees work the same as tags on jobs and quotes.
Click Create at the bottom. The employee gets an invitation email with a link to set their password.
3. Understand the access levels
Section titled “3. Understand the access levels”Service Buddy has seven built-in access levels. They appear in the dropdown in this order:
| Access Level | Typical use |
|---|---|
| Admin Staff | Office managers and owners’ right-hand staff. Broad access. |
| Office Staff | Admin, scheduling, day-to-day office work. Limited settings. |
| Field Worker Staff | Measurers and estimators going to the client’s site. Sees only their own assigned jobs. |
| Sales Staff | Salespeople on the showroom floor. Quotes and client-facing work. |
| Marketing Staff | Marketing and lead management. |
| Accounting Staff | Invoices, payments, and reports. |
| Installer | Your install crews. Sees only the jobs they’re assigned to, with the access they need to do the install. |
For a deeper breakdown of what each access level can and can’t do, see Assign roles and permissions.
4. Edit or remove an employee
Section titled “4. Edit or remove an employee”To update an employee’s details or access level:
- Go to Settings → Manage Team.
- Click the pencil icon on the employee’s row to open the Update Employee drawer.
- Make your changes and click Update.
To remove an employee:
- Click the delete icon on the employee’s row.
- A confirmation dialog shows any jobs and tasks linked to that employee.
- Click Delete to confirm.
What does a Field Worker Staff actually see when they log in?
Just the jobs they’re assigned to — either jobs they created or jobs where they’re on the team. They see the client info for those jobs and can add notes and photos. They don’t see other people’s jobs, your pricing margins, or financial reports. Good fit for in-house measurers on a phone or tablet at a job site.
Should subcontract installers have a login?
Usually no. If they’re outside crews, add them under the External tab in Manage Team instead. You can put their details on a Work Order for any job they’re handling, without giving them a Service Buddy login.
What happens if an employee leaves?
Delete them from Manage Team. Before you delete, reassign any open jobs and tasks they’re linked to — the delete dialog shows you what’s linked so nothing falls through the cracks. There’s no deactivate option, so for someone you might re-hire seasonally, you’ll need to re-invite them with a fresh login when they’re back.
Can two people share one login?
Not recommended. Each person should have their own login so the activity log shows who did what — useful when you need to track who edited a quote, processed a payment, or completed a job.
How do I assign a measurer to a specific store?
In the Update Employee drawer, set their Location assignments. See Assign employees and jobs to locations. This matters for multi-store retailers.
Can I limit which jobs an installer sees?
Yes — that’s the default behavior. Field Worker Staff and Installer access levels automatically see only jobs they created or are on the team for, not the full Jobs list. Adding someone to a job’s team is what makes that job visible to them.
Now that your team’s set up, you’re ready to put Service Buddy through its first real workflow. The next article walks through a complete job from creating a client to collecting payment — about 15 minutes start to finish.