Add an employee
Before you can schedule jobs or track commissions, every person on your team needs an employee record. This article walks you through adding a single employee. If you have a long list already in a spreadsheet, skip to the bulk import tip at the bottom.
Before you start
Section titled “Before you start”Have these handy for each new employee:
- First and last name
- Email address (this becomes their login)
- Mobile number
Add the employee
Section titled “Add the employee”- In the left sidebar, click Settings.
- Under Team Settings, click Manage Team.
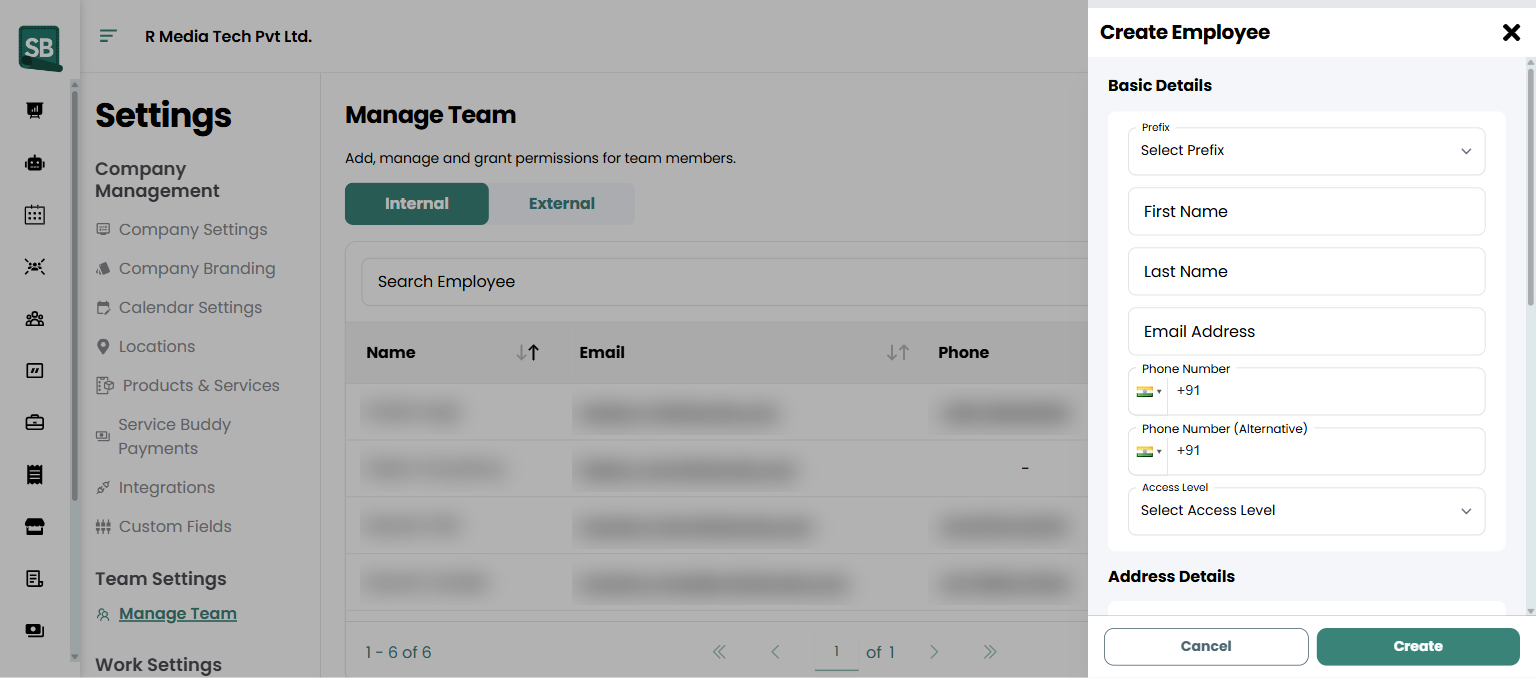
- Click + Create in the top right.
- Fill in the required contact fields: First Name, Last Name, Email Address, and Phone Number. Pick the correct country code from the flag dropdown.
- (Optional) Select a Prefix (Mr., Ms., Mrs., Miss., or Dr.) from the dropdown.
- (Optional) Add a Phone Number (Alternative) as a backup contact.
- Set the Access Level from the dropdown. This controls what this person can see and do in Service Buddy. See Assign roles and permissions for details.
- Fill in Address Details if you want to store their home or work address.
- (Optional) Add Tags under Other Details to categorize the employee (for example,
Install Crew,Measure Team,Sales,Office). - Click Create.
What happens next
Section titled “What happens next”- Service Buddy sends an invitation email to the address you entered. The employee clicks the link to set their password and log in.
- The new employee shows up in the Employees list immediately and can be assigned to jobs and tasks right away.
- If you use commission tracking, the employee is ready to earn on any jobs they are assigned to. See Set commission rates per employee to give them a custom rate.
Can I add someone without an email?
No — email is how Service Buddy sends the invitation and how the employee logs in. If a member of your install crew doesn’t have a personal email, set up a free one (Gmail, Outlook) just for Service Buddy.
What if the employee quits or moves on?
Open their record and click Delete. Their history stays intact on past jobs and invoices, but they can no longer log in or be assigned new work. See Remove or deactivate an employee for the full walkthrough.
Can I add subcontractors or 1099 installers?
Yes — but they go on the External tab and don’t get a Service Buddy login. You store their contact details so you can pick them when generating a Work Order for a job they’re handling.
What’s the difference between Internal and External tabs?
Internal is for team members getting their own Service Buddy login (sales, office, in-house measurers, in-house installers). External is for outside crews you don’t give logins to. Internal employees get an Access Level that controls what they can see and do; External members don’t have an access level at all because they don’t log in.
Does adding an employee count against my plan’s seat limit?
Internal employees (who get a login) count against your seat limit. External team members don’t, since they don’t log in. If you’re tight on seats, check whether outside crews really need a Service Buddy login — usually they don’t, and the External tab is the right home for them.
When does the invitation email go out?
As soon as you click Create. The employee gets a link to set their password and log in. Invitations are valid for 7 days; if the employee misses the window, resend from their record.
Can I bulk-import employees?
Yes — use Import on the Manage Team page. Download the sample template first so your CSV columns match. Useful when you’re switching from another system or onboarding a whole new install crew at once.
Can I edit an employee’s email after they’ve been added?
Yes — open their record and update the email. They’ll log in with the new address going forward. Existing past records (jobs they were on, notes they wrote) keep showing the employee’s name correctly; only the login address changes.